
It’s cold, it’s wet, some of us still have snow. That means it must be opening day soon! Opening day preparation must go on regardless, so what can we usefully do now?
There will of course be a distinct North/South divide in the UK with regards to soil temperature and growth, but over the next few articles I hope you will find some useful tips to help you get the green ready for Opening Day.
Evaluation Time
The first step in deciding the program for the coming month or so is to find out what you’re dealing with.
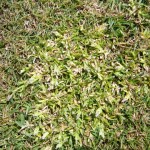
- Begin by removing any debris from the green such as leaves, twigs and worm casts. It’s best to do this in dry conditions, preferably with a light breeze to assist you. Use a switch and/or brush to slowly move the material in the direction of the wind, into rows or right off the edge into the ditch for gathering up if there’s not too much of this. If you have a leaf blower, this can speed things along. Try to keep the green free of debris like this from now on and remove dew each morning by switching or dew brushing.
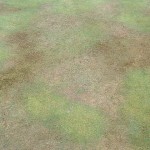
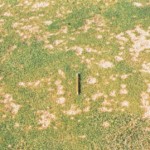
- Now, take a proper look over the green and draw or note down the approximate position of any problems or areas of concern you see out on the green. These could include issues such as areas of disease, old disease scars, wet patches, soft patches, weeds, moss infestation, thin grass cover, bare areas, yellowing grass and scrapes/holes. Stand back or better still get upstairs in the clubhouse where you can get an overview of the entire green and note where you see any obvious patchy or yellowing/discoloured areas on the green.
- If conditions allow, set the mower to 8mm (adjust upwards if you think you’re taking too much off), make sure it’s cutting cleanly, the cylinder turning easily and give the green a cut. As you go, be aware of any bumps, dips or undulations you feel through the mower and make notes accordingly.
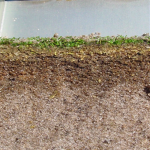
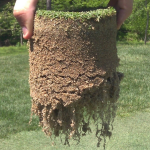
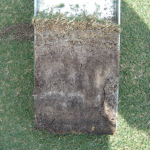
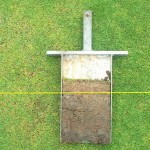
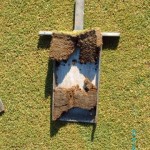
- Now it’s time to get serious, so, armed with a soil sampler or old golf hole cutter, the next job is to remove some soil profile samples from a few different areas on the green. especially any areas that look weak or suspect in any way.
Soil Profile Sample Pointers
Once you’ve got your soil profile sample out of the green you’ll be using all of your senses to evaluate the green condition.
- Use your nose first; is there a funny smell? Good healthy soil, smells good enough to eat (I’m weird, please don’t eat it), but anaerobic, thatchy, wet turf will smell of sulphur (mild rotten eggs/stink bomb smell) and is in desperate need of oxygen via aeration. The smell will lessen the longer the sample is out of the ground, so have a good sniff right away.
- Next have a good look at the whole sample: Is the grass on top fine, wiry and green, yellow and weak looking or is it missing completely?
- Still on visual appraisal look for any layering through the sample. A good, healthy soil will be homogenous with no obvious layering.
- Now look at the top of the sample and gauge how thick the thatch layer is. 5-10mm is OK, but anything more is excessive, although it might well be thicker at this time of year as the soil microbial activity will have been slower during the cold months. Try pulling the thatch layer away from the sample. Does it come away easily in one obvious layer? If so it it could be causing a barrier to roots getting into the soil (root break). Finally, if the thatch is quite dense and thick, give it a squeeze between thumb and forefinger to see how it acts like a sponge, holding water at the surface. This can encourage disease and a slow, bumpy surface.
- So we’ve looked, smelled, almost tasted (please don’t) and felt the sample, which only leaves listening. Now I could suggest listening to the sample for a while, which would be a cruel, childish prank, there’s usually nothing to hear. I would, however, encourage you to listen carefully to your inner greenkeeper. With repetition and experience you will develop an instinct for what needs to be done just by evaluating soil samples like this, so keep sampling and keep listening.
Next time, we’ll decide what needs to be done about the things we’ve found.