
In our quest to fix your bowling green so far we’ve taken some soil profile samples from the green and investigated these to see what they can tell us about what’s going on beneath our feet.
In my experience any club that’s got to the stage of heeding advice like this probably has at least a couple of the problems we discussed in part 2. Let’s take a more detailed look at some of these.
Soil Texture and Layers
When you rub some of the soil between your fingers you will get an instant feel for it’s texture and moisture levels. The soil texture is a measure of how sandy or otherwise the soil is. You might be able to detect markedly different textures in the different visible layers.
The Improved Horizon
The first distinct layer you should be able to detect is the line between the natural, original soil the green was built with and the Improved Horizon which will be roughly 100 to 150mm (4″-6″) deep and at the upper part of the sample. You will probably notice a marked difference between the two. The upper (improved horizon) will in most cases be sandy and the layer below will be of heavier soil. This split is caused by the majority of the aeration and top-dressing being carried out in this top layer. Bowling green machinery rarely penetrates the surface by more than 150mm and hollow cores are usually no more that 125mm deep, so this is where you will find the concentration of top dressing material.
Problems associated with this will include rootbreak due to sudden changes in hardness where plant roots start to grow laterally. A compacted pan (hard layer) can occur where these two layers meet due to the repetition of aeration work to the same depth, in much the same way as plough pans occur in arable fields.
You might also see a black layer which has a bad “eggy” smell when you break it open. This is an anaerobic layer caused by a lack of oxygen and usually found in conjunction with compacted soil. If you break the sample open and leave it on the surface for a few minutes you might see the black colouring fade away as the oxygen gets at the soil.
Additionally, you might see layers of every one of the top-dressing products that have been used on the green over the years. If you can see layers, you’ve got work to do.
Root Density and Depth
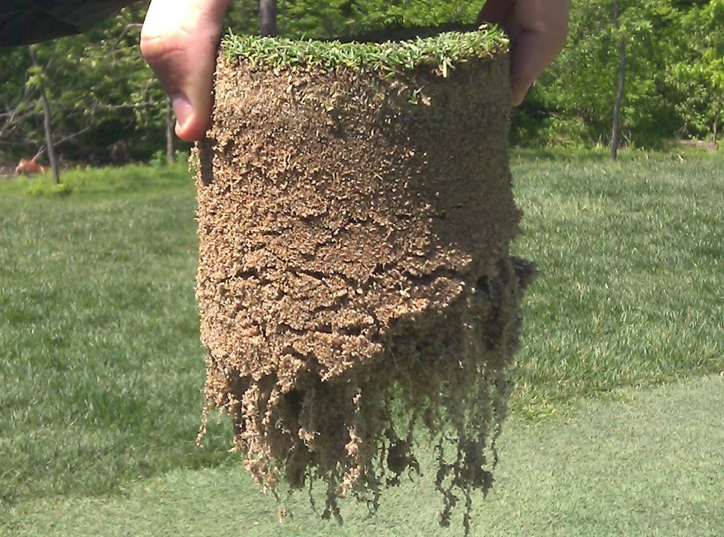
In mid summer, you should notice a dense mass of roots spreading through the sample with a lot of these dangling out through the bottom of the sample and it should be possible to reveal these further by simply shaking or scraping away some of the soil, while the turf generally still holds together.
On greens where annual meadowgrass is the predominant species, this wont be the case and you might not see any significant rooting below the thatch layer, which demonstrates the need to encourage the finer bent grass (agrostis) and develop a program that moves the green towards a healthier growing pattern. Shallow roots and the clumpy growth pattern of annual meadow grass means that it gets stressed very easily in dry weather and is susceptible to skinning, especially on heads.
Root Depth
A lot is made of root depth and of course deep roots are preferable to shallow ones. As a poverty grass that has evolved to withstand drier soil conditions, Bent grass will naturally put down roots that penetrate deeper into the soil than meadowgrass. However, the depth of roots is directly correlated with leaf tissue mass; more leaf matter on top, equates to more root mass below. Due to this, you should’t be too worried if you don’t have roots all the way to the bottom of the sample when your are mowing the top leaf matter down to 5mm or below. Layering in the soil will also have an effect on how deep the roots go.
Thatch
Probably the most important aspect of taking samples is to check the thatch layer as this will tell you more about the green than almost anything else. On a healthy green that is alive with microbes and strong, fine grass cover the thatch layer will be no more than 5mm thick.
Thatch is a layer that builds up on top of the soil when dead or dying organic material from the plants accumulates. This material is actually the raw material for the natural nutritional cycle usually managed by the soil organisms and micro-organisms. When they aren’t in abundance this layer can build up quickly and become a problem.
Bent Grass and Thatch
In addition to this by encouraging strong, modern strains of bent grass, we also encourage a bit of extra thatch build up as bent grass is a prolific producer of thatch. Creeping bent grass which is used a lot in modern golf green construction is probably the most prolific strain.
This usually means that we have to take some physical, remedial action to keep thatch under control even on a healthy green, as thatch can bring a lot of trouble with it.
- Localised dry patch affected greens will usually have a thick thatch build up due to low microbe populations, usually as a result of an excess of sand in the rootzone.
- Thatch can act like a sponge in wet weather, which encourages disease outbreaks.
- It can become hard and impermeable in dry weather making it difficult to get water into the turf.
- Combined with excessive sand in the rootzone a lot of greens will succumb to Localised Dry Patch.
- Thatch fungus and/or general drying out of the thatch can cause parts of the green surface to shrink/recede below the general grade, making the green bumpy and unpredictable. This is one of the main causes of the “bad run”
Soil Chemistry
Your Soil Analysis results will include a plethora of useful information that can guide your maintenance program. Poor Base Saturation can lead to low pH and poor CEC. High levels of Sulphate might indicate wet soil due to excessive Organic Material such as thatch and poorly decayed plant material. More on what you can expect from your soil analysis here.
And there is still time to arrange your soil analysis here:

Conclusion
The simple soil sample can help you identify a multitude of issues with your green. I recommend that every greenkeeper makes soil sampling a regular part of his or her weekly activities.
Next time we’ll do something strange. We will register what we’ve found during our investigation, but we won’t react to it in the way you might expect.
Meantime, you can get way ahead of the game by simply buying Performance Bowling Greens for the price of a bag of cheap fertiliser!