Yes I’ve come over all Latin today; and no, it’s not because I can’t believe my old jeep sailed through its MOT yet again last week!
Even the garage owner was amazed that he couldn’t find anything wrong with it.
He sent me off with “I’ll get you next year!”
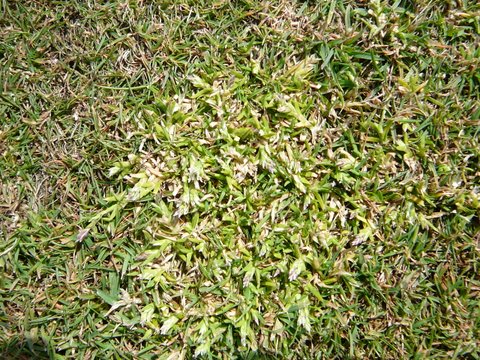
No, the Latin was inspired by a photo I received from a regular reader who sent it in to illustrate a problem he had on his green with red-thread.
However, the reason for this post is not to discuss Latin, or Red-Thread for that matter.
The clump of grass in the centre of the photo is annual meadow grass, or Poa annua to use its botanic name.
It’s not that we greenkeepers are more cultured than the average man in the street, more to do with college lecturers who insisted that we learned to identify and remember the botanic names for hundreds of grasses, trees, shrubs and weeds.
Incidentally this came in useful when I was leaving the MOT station, as I casually threw in a final, killer comment of “you need to get your Tarixicum officianale (dandelion) sprayed before it takes over the yard!”
Back to the clump of meadow grass.
This is actually a weed ( an unwanted plant in its current state and location) as we are really trying to create and maintain a sward of finer fescue and bent grasses for the best bowling surfaces.
Unfortunately, almost (probably all) all of the bowling greens in the UK will be infested with this grass.
Even newly built greens constructed on sterile rootzone material will show signs of this weed within 2 years as its seed blows in from the surrounding area.
From the picture you can see it at its worst aesthetically, which it usually is at this time of year. Right through May and June it will show up as unsightly clumps of lime green grass which contrasts vividly with the other darker green species.
Also at this time it will be seeding like mad.
The visual problem recedes as the summer progresses, but it does actually produce seed all year round.
Scarifying, verti-cutting and close mowing are of minimal value in removing the seed heads and to some extent can actually help annual meadow grass to thrive in the summer.
This is because it has a very low and prostrate growth habit which keeps the majority of the plant including seed heads below the cutting blades.
Excessive scarification and verti-cutting can actually weaken the finer fescue grass leaving the annual meadow grass with a stronger chance of survival.
It does have one Achilles heel and that is water.
Poa annua is a very shallow rooting grass and the Performance Greens program is designed to allow greenkeepers to keep the surface of their greens a little drier than most, thus putting the weed grass under pressure.
This is achieved by managing irrigation to ensure that the green is watered deeply, but irregularly which also has the effect of encouraging deeper rooting of the finer, desirable grasses.
The program also calls for a more sensible approach to cutting heights, whilst using other methods to achieve green speed. This allows the finer grasses to put down even deeper roots and also strengthens plants against drought and wear.
Poa annua is however likely to be with us ad infinitum as it is a very adaptable grass.
This adaptability is actually a good thing in the end as over time the grass becomes finer and blends in more readily with the finer grasses.
It is perfectly feasible still, however, to have a green that is predominantly fine and to keep Poa annua under control over the long term by following a sensible program that encourages the development of a healthy living soil which in turn will support a strong and dense sward of finer grass.