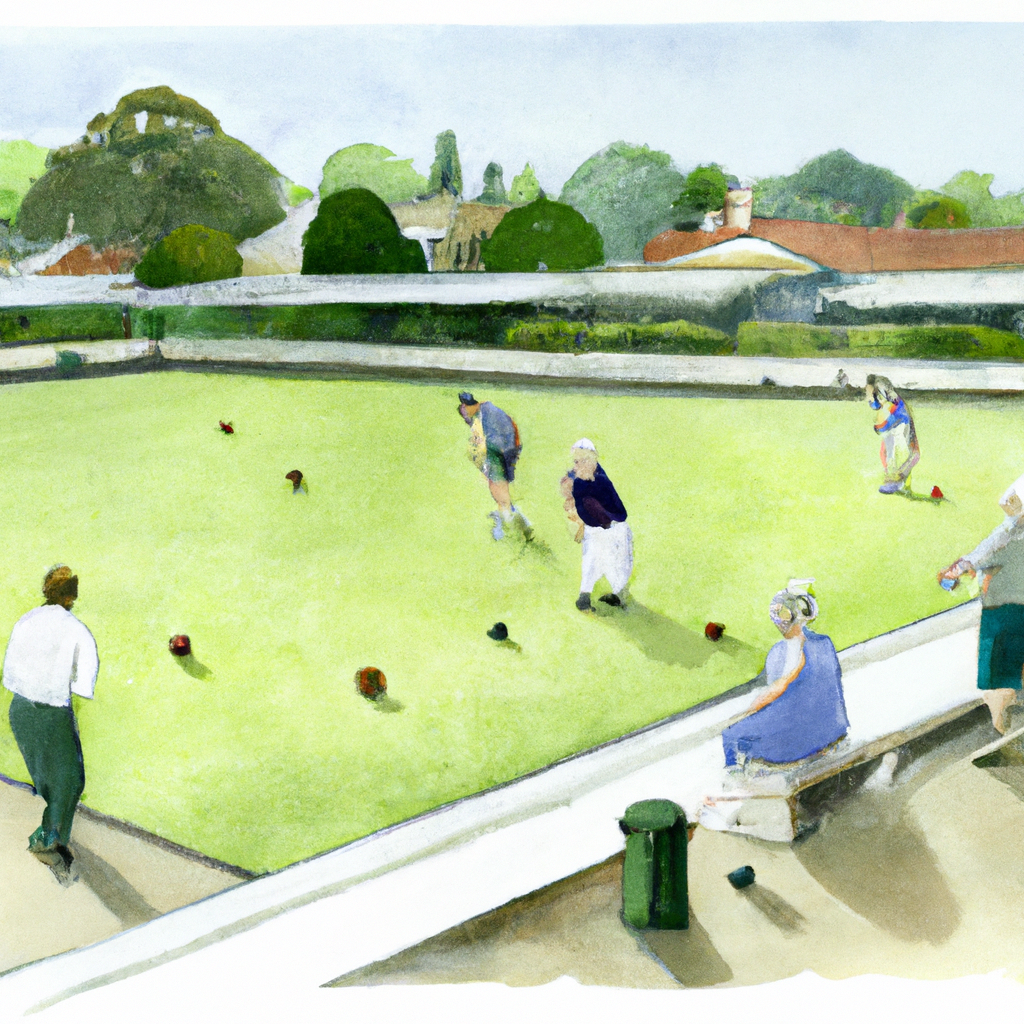
The great debate about green speed has raged on since the beginning of the game. But what are the factors known to affect green speed?
In order of their impact on green speed these are the top 7 factors that you should bear in mind. Obviously there are others such as weather patterns, level of play etc, but these are largely out of the greenkeepers control and in any case do not figure highly in green speed management.
In response to my request for readers to share their ideas and experiences, Bowls-Central regular Syd Kennerley sent me a photo of his green aerator a few weeks ago.
This is a machine that Syd designed and built himself and it seems to be a very effective addition to his machinery shed.
Syd kindly agreed to share the story with us, so here it is in Syd’s own words:
John
Some 15 years ago I decided to buy a spiker for our Bowling green; it was a two cylinder job, about two feet wide.
When pulling it, the spikes went in to about one inch depth, but I noticed when I pushed the machine in front of me it then went in to a depth of about two inches.
In those days I was a farmer and agricultural contractor, I had done Moto cross riding, Football, and also a bit of tug o war so I was reasonably fit and not frightened of hard work, but I swear to you had I continued spiking our green with that machine I would now be bowling on that superb green just beyond those Pearly Gates.
I had to find a better solution to spiking the green and I had an old 24inch ride on mower which was surplus to requirements which I had already decided to sell at an implement sale at our local cattle market. I loaded the old mower and dropped it off at the sale and on the way home I stopped off to take a look at the green.
I thought “this green could do with spiking” but I couldn’t face yet another trudge over the green with the old spiker. While driving from the green to home I started thinking that I could make a powered spiker by using the old mower, yes the mower that was about to be sold at the implement sale!
I couldn’t get back in time to stop the mower being sold, so I rang the market and told them to put a reserve price of £500 on it and of course I got a phone call around 5pm to say the mower had not been sold due to the high reserve.
With the mower back I was able to make a start on my project. I started by removing the cutting cylinder and front roller. I then removed the rear drive rollers as that was where I wanted the spike rollers to fit thus making a powered spiker. The front roller I then mounted behind the spiked cylinders; so that I could rock it back onto it for turning corners. I also used the guard of the spiker as you can see on the photo.
The day of the trial run arrived on my lawn at home with just my wife to witness this grand occasion. I set the throttle just nicely ticking over and released the clutch. When she managed to finally stop laughing my wife saidif I had not held on to it so tightly it would have out raced me to the thornedge without a shadow of doubt, so back into the workshop yet again.
After many visits to a lawnmower repair firm sifting through all his old sprockets, chains, and bushes I eventually got there, now ticking over it goes at a slow walking pace.
For the photo, I have taken the guard off so you can see the gearing down sprockets. You will also notice the two weights which slot onto the front;with these on it will go down to maximum depth if needed. When spiking the green I start on the outside and keep going round and round until I get to the centre, the reason for this is the machine works best going in straight
lines so doing it this way I only have to make 90 degree turns rather than 180 degree, if I went back and forth as you would to cut the green.
It also helps to keep compaction to a minimum and away from along the side where you might want to start your matches from.
I hope I have not spoiled the picture with having yours truly on it!
Thanks again John, for all your help and information you pass to me,
Regards
Syd.
Thanks Syd for this fantastic story; a great example of the ingenuity and resourcefulness that goes on at clubs around the country and an example of the kind of helpful thinking we need to adopt in the future if we are going to have thriving bowling clubs.
Now Syd, I need to know before Sunday: Have you ever played rugby (even once!) and do you have any distant Scottish relatives?
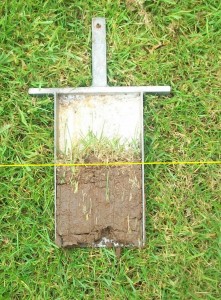
Where grass grows on soil of any type the health of the turf/soil eco-system can be assessed by looking at the thatch layer.
On grass areas where there is little or no human interference in the form of excessive compaction, fertiliser, pesticides and mechanical work (other than mowing) such as in meadows or parks the thatch layer will almost always be at the optimum level for a continued healthy turf/soil eco-system. This is due to the soil/plant relationship being in balance; a strong and sufficiently lively soil microbe population releases nutrition from the thatch layer as it decomposes naturally.
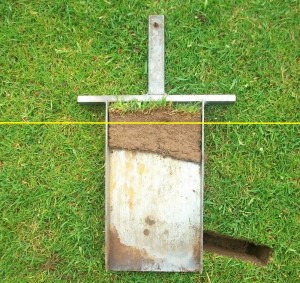
As we move to areas that are subjected to progressively higher maintenance and wear activity, the thatch layer is susceptible to becoming thicker and denser and therefore needs more intensive management if the turf/soil relationship is to be kept in balance.
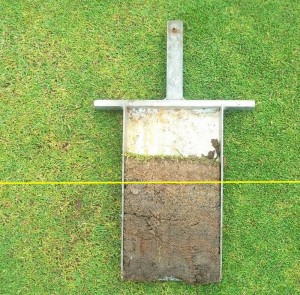
This can be observed by taking samples from a variety of grassed areas and comparing them to your bowling green’s thatch layer; rough meadows and areas such as the roughs on golf courses being the most natural and healthy areas and greens usually being the least healthy and in need of the most remedial work to keep them right.
soil/turf sample taken from a golf rough; an area of relatively un-managed turf showing optimum healthy thatch layer (click for larger image)
sample taken from a golf fairway which is more intensively managed showing a thicker but still relatively healthy thatch layer (click for larger image)
thatch builds up quickly on unhealthy greens
When turf is used for bowling or other activities, the soil becomes compacted which is literally the expulsion of air from the soil. This throws the natural balance in the turf/soil relationship and makes it necessary for us to intervene to correct things.It is important to remember that thatch is always being produced and the more vigorous and intensively used and managed the turf is the faster it produces thatch. The desireable fine bent grasses and the common weed-grass, annual meadowgrass are prolific thatch producers.
If we don’t do the right things to correct this effect or indeed if we don’t do them often enough the green can very quickly fall into the circle of decline we looked at in an earlier article.
Air is a very important component of a Performance Bowling Green.
50% of a healthy, performance green will be air; 25% Micro-pores and 25% Macro-pores.
The Macro Pore or “aeration” space is where drainage happens.
The Micro-Pore or “capillary” space is where grass plant roots get their water and nutrients.
Tip the balance in favour of one or the other of these and things start to go wrong.
Compaction reduces the Macro air space in soil and inhibits drainage and root penetration. The soil now holds on to too much moisture and a whole raft of other problems ensue; particularly the build up of excessive thatch due to the anaerobic (lacking in oxygen) soil conditions brought about by the reduction in air space.
Thatch becomes a breeding ground for fungal disease and a base for Localised Dry Patch to take hold. The thatch doesn’t break down naturally as it should because there is a massive reduction in the population of aerobic soil microbes and they usually do this job.
Tip the balance the other way by applying excessive amounts of sand top-dressing and there is now too much air space, there is very little capillary space and the green starts to dry out too quickly. Localised Dry Patch now takes over, the surface is unpredictable and the soil can’t provide the nutrition the plants need naturally any more.
Yes, for a healthy living green that performs to order you need a lot of space; 50% air space.
Luckily, a healthy living soil knows how to do all of this without us.
We are only needed to help rectify the damage we inflict, which is mainly compaction and nutrient depletion through the removal of grass clippings.
Doug has adapted his rotary mower to save a lot of back breaking work
Straight after my request for guest posts/articles Doug Smith shares this labour saving idea for light aeration of the green. This follows on from Rob’s recent post on hand fork aeration. I’ll let Doug do the talking now:
Hi John, I have been reading your advice on green Aeration, the one on using a fork, I too have used a fork to
do the job, but only for a short time, I found it took far to long, and very hard work, so I gave it some thought,
and adapted my lawn mower, [see photo,] I use it on my home lawn, twice a month, and on the Bowls green.
hope this is of some use to your readers.
Regards Doug Smith
Thanks very much Doug for sharing this with us and hopefully it will be the first of many from readers in the coming months.