Home » compaction

Tag: compaction

Compaction

Bowls Green Compaction

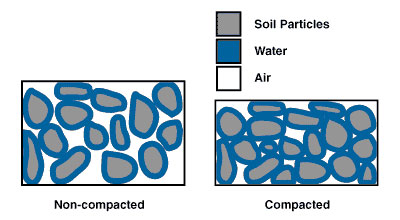
I once commented that there are only ever two real problems in bowling greenkeeping; compaction and thatch, with the rest of the myriad problems we come across being merely symptoms of these Big Two. Lately, I've revised that thinking, as the more I see of ill treated bowling greens the more I realise that, although they are important, even thatch and compaction are only symptoms too. The trouble we face in greenkeeping is that the industry wants us to treat symptoms. If we treated the root cause after all, we wouldn't need to buy half as much stuff! But before we get too carried away, let's have a recap on what bowls green compaction actually means.

Read more

Syd’s Aerator

Syd with his spiker

In response to my request for readers to share their ideas and experiences,  Bowls-Central regular Syd Kennerley sent me a photo of his green aerator a few weeks ago.

This is a machine that Syd designed and built himself and it seems to be a very effective addition to his machinery shed.

Syd kindly agreed to share the story with us, so here it is in Syd’s own words:


John
Some 15 years ago I decided to buy a spiker for our Bowling green; it was a two cylinder job, about two feet wide.
When pulling it, the spikes went in to about one inch depth, but I noticed when I pushed the machine in front of me it then went in to a depth of about two inches.
In those days I was a farmer and agricultural contractor, I had done Moto cross riding, Football, and also a bit of tug o war so I was reasonably fit and not frightened of hard work, but I swear to you had I continued spiking our green with that machine I would now be bowling on that superb green just beyond those Pearly Gates.
I had to find a better solution to spiking the green and I had an old 24inch ride on mower which was surplus to requirements which I had already decided to sell at an implement sale at our local cattle market. I loaded the old mower and dropped it off at the sale and on the way home I stopped off to take a look at the green.
I thought “this green could do with spiking” but I couldn’t face yet another trudge over the green with the old spiker. While driving from the green to home I started thinking that I could make a powered spiker by using the old mower, yes the mower that was about to be sold at the implement sale!

I couldn’t get back in time to stop the mower being sold, so I rang the market and told them to put a reserve price of £500 on it and of course  I got a phone call around 5pm to say the mower had not been sold due to the high reserve.

With the mower back I was able to make a start on my project. I started by removing the cutting cylinder and front roller. I then removed the rear drive rollers as that was where I wanted the spike rollers to fit thus making a powered spiker. The front roller I then mounted behind the spiked cylinders; so that I could rock it back onto it for turning corners. I also used the guard of the spiker as you can see on the photo.

The day of the trial run arrived on my lawn at home with just my wife to witness this grand occasion. I set the throttle just nicely ticking over and released the clutch. When she managed to finally stop laughing my wife saidif I had not held on to it so tightly it would have out raced me to the thornedge without a shadow of doubt, so back into the workshop yet again.

After many visits to a lawnmower repair firm sifting through all his old sprockets, chains, and bushes I eventually got there, now ticking over it goes at a slow walking pace.

For the photo, I have taken the guard off so you can see the gearing down sprockets. You will also notice the two weights which slot onto the front;with these on it will go down to maximum depth if needed. When spiking the green I start on the outside and keep going round and round until I get to the centre, the reason for this is the machine works best going in straight

lines so doing it this way I only have to make 90 degree turns rather than 180 degree, if I went back and forth as you would to cut the green.
It also helps to keep compaction to a minimum and away from along the side where you might want to start your matches from.

I hope I have not spoiled the picture with having yours truly on it!

Thanks again John, for all your help and information you pass to me,

Regards
Syd.

Thanks Syd for this fantastic story; a great example of the ingenuity and resourcefulness that goes on at clubs around the country and an example of the kind of helpful thinking we need to adopt in the future if we are going to have thriving bowling clubs.

Now Syd, I need to know before Sunday: Have you ever played rugby (even once!) and do you have any distant Scottish relatives?

Bowls Club Survival and Turnaround

Bowling Club Survival and Turnaround

Our eBook Bowling Club Survival and Turnaround is now available.

In this much awaited text John breaks down the process of saving your bowling club from financial trouble and moving on to great success into 7 clear steps:

  1. How to stem the flow of cash out of your club starting today and how to prime a pump that will see more cash flowing into your club effortlessly.
  2. The remarkable 10 Minute MBA or how to build a business model that works for your club.
  3. An amazingly simple but powerful formula that will ensure your club stands head and shoulders above all of your competition.
  4. In a revolutionary take on the Marketing of your rejuventated club we turn the commonly accepted view and perceived “wisdom about Marketing firmly on its head! In this remarkable section we demonstrate  “paint by numbers instructions for achieving all of the members you want with a vastly reduced Marketing budget.
  5. Step 5 provides what can only be described as ABC style instructions and guidance to turn your club into a smooth, efficient and profitable machine.
  6. In step 6 you’ll discover a  remarkable system for adding 20-30% of your current income straight onto your bottom line profit!by dealing with waste in your club.
  7. “Step 7 is essentially a method for bringing all of the previous steps together into an automatic club improvement system. Even after you’ve applied the first 6 steps and have a thriving, profitable club; this step pretty much guarantees that even a very efficient club will improve bottom line performance by at least 10% every 3 months

The ebook is available now just click here

Premiership Thinking for a Successful Bowls Club

We can learn a lot from the Premiership’s problems

A BBC2 program “Lord Sugar Tackles Football”, exposed the failures in the English Football Premiership. In a nutshell the program argued that although the creation of the super league of top clubs had resulted in the generation of vast sums of money for football, the overall result has been to create a mountain of debt and indebtedness.

Lord Sugar’s conclusion was that something had to be done about player salaries to stop the rot and that the Premiership should allow one or two high profile clubs to go under to illustrate the dire nature of the situation to the Saturday afternoon faithful, who, after all, actually supply the vast sums of cash being dished out to the top talent.

What on earth has this got to do with your bowling club?

Well although not directly linked (unless of course a Premiership failure would free up some punters to come along to your club next Saturday!) the action required to start the turn around of the premiership’s fortunes is very much the same as that required to turnaround bowling clubs.

Now I know that there aren’t any bowlers, professional or otherwise earning £20,000 a week, but Read more

green maintenance

Bowls Green Maintenance

A very general title for today’s article, but it reflects the current industry desire for a fix all solution to achieving a good bowling green.

Most clubs are unhappy to some extent with the performance of their bowling greens.

This leads to an open ended search for solutions where the searcher i.e. the bowling club or bowling club management official simply looks for information from whatever source to help with the perennial problem of the bowling green.

If this is you, if you simply don’t know where to start in your quest for the truth about achieving a consistently good bowling green here is my suggested reading in order of importance. You can click on these links for more in depth information:

  1. Top-dressing
  2. Thatch
  3. Compaction
  4. Green Speed
  5. Green Consistency


Bowls Green Maintenance Basics – Surface Consistency

Have you ever played a great game of bowls when everything on the green was perfect; you read every twitch on the rink and it seemed like you had finally got the green the way you wanted it.

The disappointment when you return to the green the very next day, prepare the rink in completely the same way but get totally different and inferior results is maddening.

What went wrong? or maybe what went right?

Like green speed, there is much debate about surface consistency, both in terms of consistency across the green surface and consistency of playing conditions over the season.

In order of their impact on green surface consistency these are the top 7 factors that you should bear in mind. Obviously there are others such as weather patterns, level of play etc, but these are largely out of the greenkeepers control and in any case do not figure highly in the management of green consistency.

  1. Fertiliser Policy; yesterday we talked about the role that Bio-Liquid fertilisers can play in producing Performance Bowling Greens. The use of these products is recommended primarily in order to help in the improvement of the underlying soil; but this has a knock on benefit of smoothing out the peaks and troughs of fast and slow growth to a more steady and slow growth pattern. I’ve made this my number 1, issue in achieving green surface consistency.
  2. Irrigation Management; understanding the water requirements and in particular soil water balance is an important aspect of green management. The finer grasses we seek to encourage can root more deeply than the weed annual meadow grass and as such our watering policy should be deeply, not daily.
  3. Localised Dry Patch Management; the scourge of many greens over the last 2 decades due, primarily to the overuse of sand top-dressings and the neglect of the soil/plant relationship. Localised Dry Patch is a condition (not a disease) that causes the soil to become hydrophobic (water repellent) and can cause major disruption to the surface levels. Localised Dry Patch is also a season long problem in most cases regardless of how much rain or irrigation there is; once it takes hold it is usually very difficult to overcome.
  4. Mowing Frequency; we looked at this issue in more depth last week. Mowing frequency is at least 100 times more relevant to green consistency than mowing height. Shaving the green down to 3mm is damaging to the grass plants and counterproductive in producing a performance green in the longer term. If we truly want a consistent green, we need to make some hard decisions on how we are going to manage the workload.
  5. Thatch Layer Control and Management; closely related to, and the catalyst for most other green maintenance problems, thatch is only a problem on intensively managed turf such as bowling greens. One of the most commonly discussed topic on this site.
  6. Compaction Control and Relief; one of the major catalysts for the build up of excessive thatch is the process of compaction of the soil. This causes the soil to become lacking aeration pore space and oxygen as a result.
  7. Sward Composition (grass types); a low priority on this list but none the less important in respect of the overall aim of the Performance Green Program. By doing the work required to encourage a tight sward of finer grasses we automatically do the things that encourage a healthy living soil and that is the key to a performance bowling green.

Bowls Green Maintenance Basics-Thatch

Where grass grows on soil of any type the health of the turf/soil eco-system can be assessed by looking at the thatch layer.

On grass areas where there is little or no human interference in the form of excessive compaction, fertiliser, pesticides and mechanical work (other than mowing) such as in meadows or parks  the thatch layer will almost always be at the optimum level for a continued healthy turf/soil eco-system. This is due to the soil/plant relationship being in balance; a strong and sufficiently lively soil microbe population releases nutrition from the thatch layer as it decomposes naturally.

As we move to areas that are subjected to progressively higher maintenance and wear activity, the thatch layer is susceptible to becoming thicker and denser and therefore needs more intensive management if the turf/soil relationship is to be kept in balance.

This can be observed by taking samples from a variety of grassed areas and comparing them to your bowling green’s thatch layer; rough meadows and areas such as the roughs on golf courses being the most natural and healthy areas and greens usually being the least healthy and in need of the most remedial work to keep them right.

When turf is used for bowling or other activities, the soil becomes compacted which is literally the expulsion of air from the soil. This throws the natural balance in the turf/soil relationship and makes it necessary for us to intervene to correct things.It is important to remember that thatch is always being produced and the more vigorous and intensively used and managed the turf is the faster it produces thatch. The desireable fine bent grasses and the common weed-grass, annual meadowgrass are prolific thatch producers.

If we don’t do the right things to correct this effect or indeed if we don’t do them often enough the green can very quickly fall into the circle of decline we looked at in an earlier article.

What causes compaction on a bowls green?

Compaction is of course one of the big issues in bowling green maintenance and people are always looking for ways to prevent or minimise its occurrence.

Compaction happens to a greater or lesser extent depending on soil type. At the two extremes of this are Clay and Sand.

Think of a potter wetting some powdered clay to throw a pot and you can immediately picture the compaction and drainage properties of this soil type; it compacts very well when wet and clay pots don’t allow drainage at all; and when clay soil is wet this is pretty much the case under your green too. Clay is a very good moisture and nutrient retainer.

Now imagine running on to the upper reaches of the beach, up near the dunes and it’s hard to imagine how this highly mobile sand could ever be compacted. Due to the particle shapes which are round, there is a huge amount of air space between particles which doesn’t allow for any level of compaction.

The above examples are, I think, the reasons that clubs have been all too eager to jump on the sand band wagon over the last few decades; more sand seems to equal better drainage and lower compaction.

The best bowling green soil lies somewhere between the two and is a sandy loam as discussed here.

So although individual actions like foot and maintenance traffic can be said to cause compaction, the underlying soil holds the real answer.

a lot of hot air?

Air is a very important component of a Performance Bowling Green.

50% of a healthy, performance green will be air; 25% Micro-pores and 25% Macro-pores.

The Macro Pore or “aeration” space is where drainage happens.

The Micro-Pore or “capillary” space is where grass plant roots get their water and nutrients.

Tip the balance in favour of one or the other of these and things start to go wrong.

Compaction reduces the Macro air space in soil and inhibits drainage and root penetration. The soil now holds on to too much moisture and a whole raft of other problems ensue; particularly the build up of excessive thatch due to the anaerobic (lacking in oxygen) soil conditions brought about by the reduction in air space.

Thatch becomes a breeding ground for fungal disease and a base for Localised Dry Patch to take hold. The thatch doesn’t break down naturally as it should because there is a massive reduction in the population of aerobic soil microbes and they usually do this job.

Tip the balance the other way by applying excessive amounts of sand top-dressing and there is now too much air space, there is very little capillary space and the green starts to dry out too quickly. Localised Dry Patch now takes over, the surface is unpredictable and the soil can’t provide the nutrition the plants need naturally any more.

Yes, for a healthy living green that performs to order you need a lot of space; 50% air space.

Luckily, a healthy living soil knows how to do all of this without us.

We are only needed to help rectify the damage we inflict, which is mainly compaction and nutrient depletion through the removal of grass clippings.

Ahh! how simple!